
Quilting
Half-Square Triangle Quilt Patterns: Layouts, Trimming and Hearts
The short answer
A half-square triangle is a square made from two triangles. Make the units a little large, trim them consistently, then rotate them into your chosen layout before joining rows.
Last updated October 2026
What's covered6
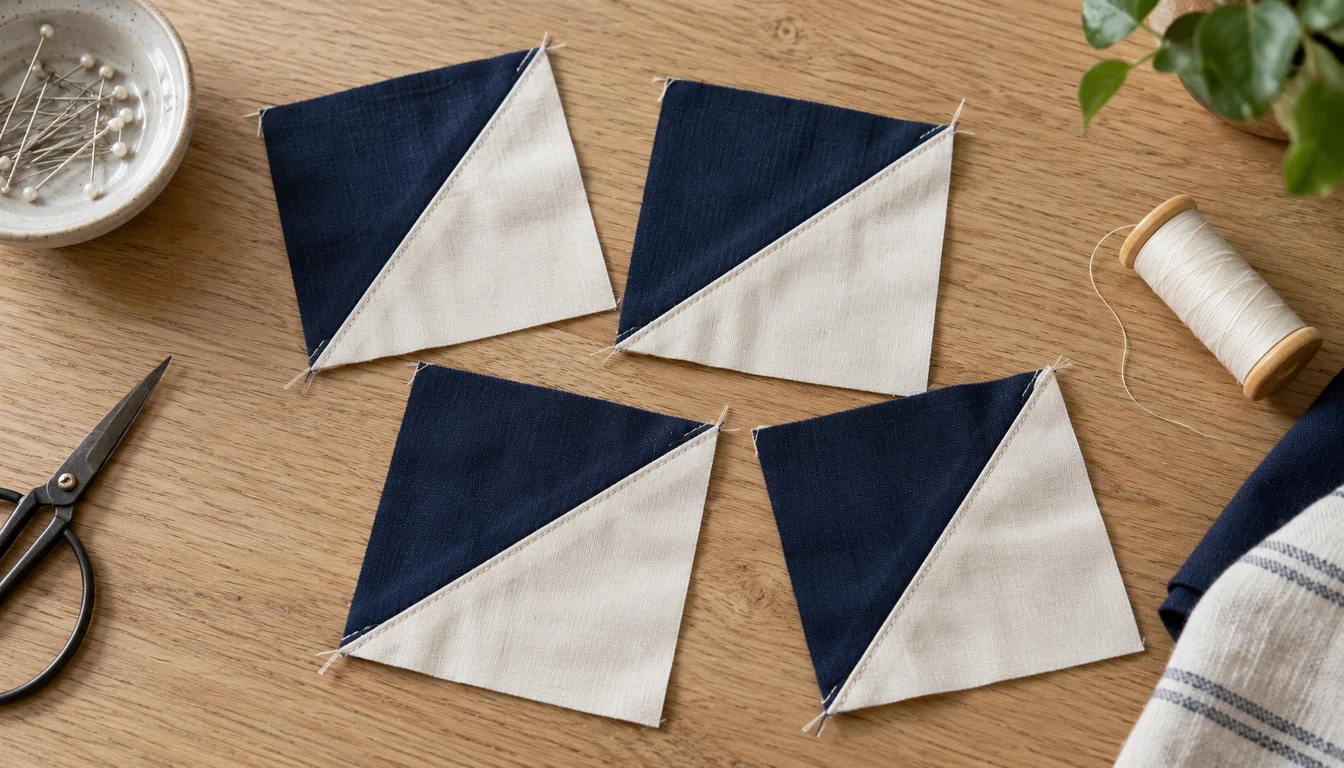
Half-square triangles, often shortened to HSTs, can form stripes, diamonds, pinwheels or a heart. The same two-color unit changes direction when you turn it. That makes the layout flexible, but it also makes a rotated block easy to miss.
Make and trim a sample pair before choosing a large batch size. The two-at-a-time method below gives each unit a little extra fabric for squaring up. The heart-panel diagram shows how triangle corners and plain squares can share one straight-row layout.
Finished size and the size on your cutting mat
The finished size is what remains visible after the unit enters the quilt's seams. The unfinished size includes those outer allowances. With ¼-inch seams on both opposite edges, a 4-inch finished unit must measure 4½ inches before you sew it into a row.
Do not confuse the starting squares with the trimmed unit. Two starting squares become two HSTs after the diagonal seams and cut. The AQS beginner triangle lesson hosted by BERNINA gives a trim-friendly rule: start with squares 1 inch larger than the desired finished size, then square up the sewn units.
| Desired finished HST | Starting squares, one of each color | Trim each sewn HST to |
|---|---|---|
| 2 inches | 3 by 3 inches | 2½ by 2½ inches |
| 3 inches | 4 by 4 inches | 3½ by 3½ inches |
| 4 inches | 5 by 5 inches | 4½ by 4½ inches |
| 6 inches | 7 by 7 inches | 6½ by 6½ inches |
Scroll for more →
These sizes are for the two-at-a-time method. Eight-at-a-time units use a different starting calculation. Follow the chosen method throughout a batch.
Make two units from one pair
Put a light and a dark square right sides together. Mark one corner-to-corner diagonal on the wrong side of the lighter square. Sew ¼ inch away on each side of that line. Cut on the line between the seams, then open the two units and press them without stretching the diagonal.
The BERNINA Skillbuilder two-at-a-time instructions show the sequence. For trimming, place the ruler's 45-degree line along the sewn diagonal and check that the required square fits inside the fabric. Trim two adjacent sides, turn the unit, and trim the remaining sides to the exact unfinished measurement.
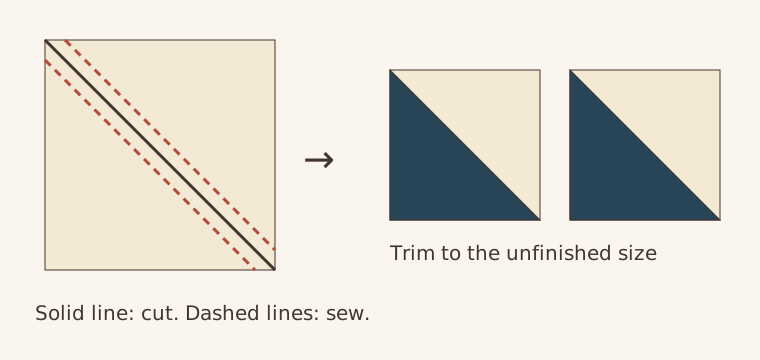
Make one pair first. If either is too small to trim, inspect the starting square and seam width. You can remake it or save it for a smaller project. Do not shrink every other unit just to match one mistake.
Choose the layout before making the whole batch
| Layout | How the units point | What to watch |
|---|---|---|
| Diagonal bands | All diagonals face the same way | One reversed unit breaks a band |
| Diamonds | Groups turn inward toward a center | Keep the group orientation consistent |
| Pinwheels | Four units rotate around one meeting point | Bulk where the four seams meet |
| Heart panel | Triangle units shape selected outer corners | Count plain squares separately |
Scroll for more →
BERNINA's half-square triangle challenge guide illustrates how rotation changes a layout. Use paper squares in two colors to compare your own arrangement. A photo of the chosen layout is useful when a row is picked up and moved to the machine.
An original eight-by-eight heart panel
This heart uses 4-inch finished units and finishes at 32 inches square before quilting and washing. It combines 10 two-color HSTs, 22 solid heart-color squares and 32 solid background squares. The diagram is the row map; the colored part of a triangle square points into the heart.
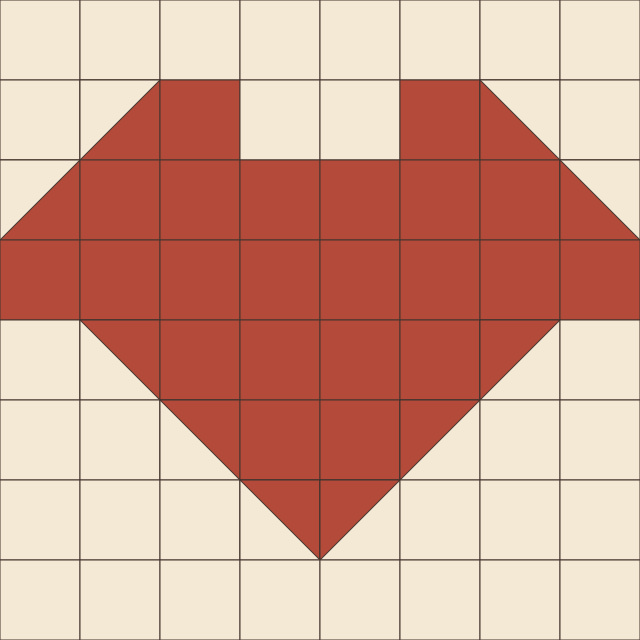
For the 10 HSTs, cut five 5-inch heart-color squares and five 5-inch background squares. Pair them and use the method above. Trim all 10 units to 4½ inches. Cut the 22 plain heart squares and 32 background squares to 4½ inches as well.
Lay out eight rows of eight units. Compare each triangle's colored side with the diagram before sewing. All 64 units have the same unfinished outer size, so they join in ordinary straight rows. No curved seam or appliqué is needed.
For a larger top, add plain rows around the panel or repeat it as a block. Calculate the finished width of each addition, then add its cutting allowances. A border drawn on a layout does not automatically include those seams.
Join rows without losing the points
Use a consistent ¼-inch allowance and check a short sewn row. Trimmed units do not protect you from an overly wide joining seam. When points meet, pin at the seam intersection rather than only matching the outer cut corners.
Press with care and keep the rows in order. Avoid pulling a long row through the machine. Check its length before sewing it to the next one. If a point is clipped, inspect the allowance at that join before changing the rest of the row.
Our needles for quilt cotton guide covers needle and thread matching. The machines for quilt piecing comparison explains useful machine controls. If triangles feel like too much for a first project, try the square-block layouts or the smaller whole-square heart pillow.
Domestic quilting or a longarm service?
Piece the top first, then measure it and decide how to finish it. A domestic machine needs room to support and move the quilt sandwich. A longarm service supplies a different setup, but it may require specific backing margins and preparation. Ask for those requirements before assembling the backing.
For either route, use the batting maker's maximum stitch-spacing guidance. Choose quilting lines that you can follow without shifting the layers, and check the reverse of a practice sandwich for folds and tension problems. Do not assume that an attractive top is already a quilt; the layers still need to be held together and the raw perimeter finished.
Our guide to hand quilting covers finishing a quilt by hand, and the beginner quilting machines guide helps if you would rather quilt on a domestic machine.
Once your triangle rows stay accurate, the Lone Star technique guide introduces diamond alignment and bias edges. It is a separate construction skill, so keep its measurements out of an HST cutting list.