
Quilting
Patchwork Quilt Patterns: Large Prints and Modular Squares
The short answer
Keep a large fabric motif in a large piece. For scraps, choose one finished unit size and build larger blocks from its multiples. Count seam allowances before cutting.
Last updated October 2026
What's covered6
A quilt layout should work with the fabric you have. A bold picture print needs room for its subject. A box of small scraps needs a size system that lets different pieces join without odd gaps. These two approaches give you useful starting points without a long list of blocks to learn.
The layouts below are new planning examples. Their sizes describe the quilt top before washing and quilting, both of which can change its final size. Make a small trial block before cutting the whole project.
Large-print patchwork and the Out to Sea quilt idea
Large rectangles give picture prints room to show their main motifs. Plan each rectangle around the image you want to keep, then check how much fabric the surrounding seams will take. A plain rectangle between two prints can help each picture stand out.
Lay a paper window over the print. The opening should show the area that will remain visible after the seams are sewn. Move it around before choosing your cut lines. Leave room for the subject at every edge, especially faces, lettering or a tall stem. A motif can fit within a cut piece and still be clipped by its seam allowance.
For example, a rectangle that finishes at 8 by 12 inches needs a cut piece of 8½ by 12½ inches when you use ¼-inch seams. Five rectangles across and four down produce a 40-by-48-inch top without borders. That is 20 rectangles. Alternate prints with plain fabric if you want more space around the motifs.
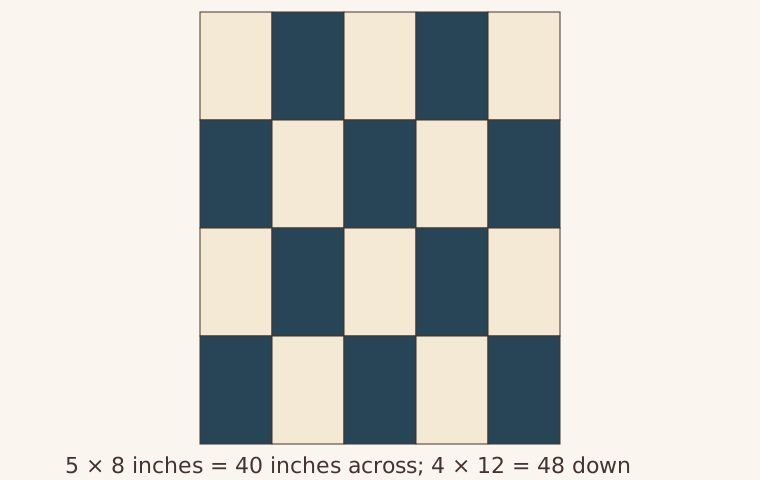
Directional prints need an extra check. Mark the top of each rectangle with a removable label, then photograph the full layout. A rectangle turned upside down may go unnoticed until several rows have been joined. Cut one sample from a less important area before choosing all 20 positions.
A square-grid quilt with fewer measurements
Equal squares are another way to keep the cutting simple. Choose a finished square size, then add the seam allowance on both opposite edges. With ¼-inch seams, that means adding ½ inch to each cut dimension.
| Finished square | Cut square | Example layout | Top size without borders |
|---|---|---|---|
| 3 inches | 3½ inches | 8 across, 10 down | 24 by 30 inches |
| 6 inches | 6½ inches | 8 across, 10 down | 48 by 60 inches |
| 8 inches | 8½ inches | 6 across, 8 down | 48 by 64 inches |
Scroll for more →
Each row uses the same square size. These are separate examples, not three sizes you can mix at random. Take the required top width and divide it by your chosen finished square width. Round to a whole number of squares, then calculate the actual top size again.
The BERNINA basic piecing ebook explains seam guides and a piecing exercise. Use a sewn sample to check the width your machine actually produces. Our machines for a first quilt comparison helps if you are choosing a machine; you do not need hundreds of decorative stitches to join squares.
Modular scraps and the Magic Number approach
Modular patchwork starts with a repeated finished measurement. Small squares can then form strips and larger squares that fit together. The example below uses a 3-inch finished base, with a ¼-inch seam allowance on each edge.
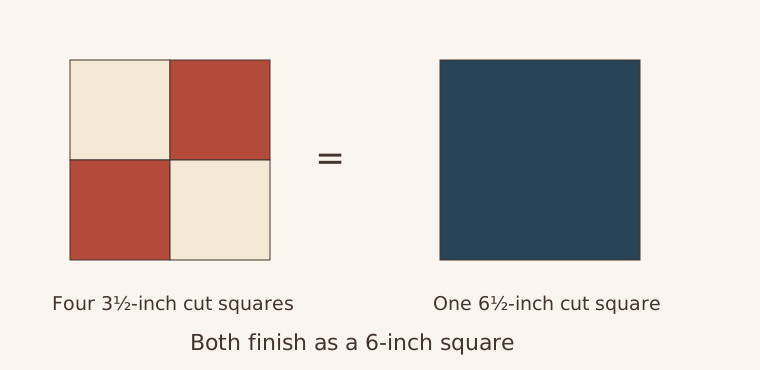
Two 3-inch finished squares make a strip that finishes at 3 by 6 inches. Four make a 6-inch finished square. Nine make a 9-inch finished square. The seam allowances explain why you cannot simply double the cut measurement.
| Unit | Pieces before joining | Size before sewing into the top |
|---|---|---|
| Small square | One 3½-inch square | 3½ by 3½ inches |
| Two-square strip | Two 3½-inch squares | 3½ by 6½ inches |
| Four-square unit | Four 3½-inch squares in two rows | 6½ by 6½ inches |
| Nine-square unit | Nine 3½-inch squares in three rows | 9½ by 9½ inches |
Scroll for more →
A single 6½-inch cut square can replace the four-square unit. A single 9½-inch cut square can replace the nine-square unit. Each then has the same outer size as the pieced version it replaces.
Build complete 9-inch finished blocks on paper before arranging the whole top. Within one such block, a 6-inch square can sit beside a column of two small squares, with three more small squares below. Join the two-square column, attach it to the large square to make a 9-by-6-inch finished unit, then attach the bottom row. This order uses straight seams from edge to edge.
If the block becomes too small, measure the individual units before trimming. Trimming a short block makes it shorter. Set it aside for a smaller project, or remake the part whose seam allowance caused the error.
When a layout needs partial seams
A drawing can look simple yet require a seam that stops partway along an edge. This happens when pieces wrap around a center and none can be attached first along its full length. A row-based plan avoids that problem.
To understand the method, arrange four paper strips around a paper center square. Start one attachment only far enough to hold the first strip. Add the other strips in order around the center. Finish the first attachment last, once its remaining edge is free. Make a fabric practice block from a published tutorial before using this construction in a full quilt. Do not assume that the panel and modular examples above require it; they use complete straight seams.
Join, press and finish the top
Number the rows while they are still laid out. Join the pieces within one row, check its length, and then work on the next. Press neighboring rows in opposite directions if that helps their seam allowances meet neatly. Keep labels on the same side so the rows do not get reversed.
For triangles rather than squares, use the half-square triangle layouts. For the next step in angled piecing, read the Lone Star construction guide. Neither needs to replace a simple grid that already suits your fabric.
Measure the completed top before buying backing or cutting binding. Backing and batting need the extra margin required by your chosen quilting method or longarm service. Read the batting maker's stitch-spacing and care instructions. For binding, the starting calculation is twice the top width plus twice its height; add the joining and corner allowance specified by the binding method you follow. A bare perimeter figure is not a complete cutting requirement.
For more ways to arrange blocks, see our guide to patterns in quilts. If you are choosing a machine for piecing and quilting, start with the beginner quilting machines guide.
Use the needles for quilt fabric chart when choosing a needle for the fabric and thread together. Make a small sandwich from the same materials to check stitch formation before putting the whole quilt under the foot.
Before cutting the rest
- The paper window includes the seams, so no important motif disappears.
- The layout's finished dimensions match the size you need.
- Every mixed-size unit has the correct outer measurement after piecing.
- Rows have a clear assembly order without trapped edges.
- Backing, batting and binding have their own measured requirements.
- You have recorded the fabric care instructions for the finished quilt.