
Quilting
Beginner Quilt: A 48-Square Project to Sew
The short answer
Start with a seam sample, keep the eight rows in order and test the quilting on scraps before finishing the full top.
Last updated October 2026
What's covered8
- Easy quilts for beginners: choose a straight square grid
- Beginner quilt cutting list and size calculation
- Check the seam before sewing the whole grid
- Lay out eight rows before joining them
- Join the rows and inspect the top
- Plan backing, batting and quilting
- Finish the edge and save the plan
- Verdict on a beginner quilt
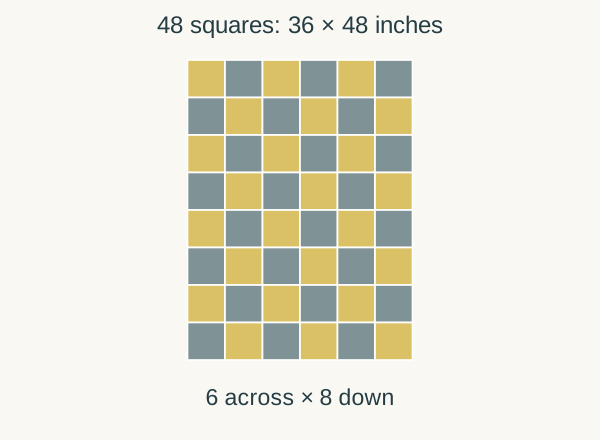
Equal squares and straight rows make a first quilt easier to sew. This beginner quilt uses 48 squares in a six-by-eight grid. Each square finishes at 6 inches, making a 36-by-48-inch top before quilting and washing.
You will practice one repeated seam and one row-joining method. Read the quilting guide for material choices, then use this page as the project plan. If you want the names of every stage first, start with quilt making for beginners.
Easy quilts for beginners: choose a straight square grid
Equal squares keep the cutting list short. There are no diagonal edges to stretch and no triangle points to preserve. The main challenge is keeping the seam allowance consistent so each row has the same length.
Choose two fabrics for a checkerboard or a small group of prints that look good together. Large prints can be easier to enjoy in larger squares, since fewer motifs fall into seams. Lay out a few pieces before cutting all 48.
For a two-color checkerboard, use 24 squares of each color. Alternate the colors across the first row, then reverse their order in the next row. Repeat those two row types four times each.
Melanie Ham's first-quilt lesson shows how to lay out squares, take a photo and keep rows in order. For the 48-square quilt on this page, follow the cutting chart and size checks below at each stage.
Beginner quilt cutting list and size calculation
Use a 1/4-inch seam allowance for this project. Each square loses 1/4 inch on both opposite edges when it is sewn into the top. A 6-inch finished square therefore needs a 6 1/2-inch cut square.
| Part | Cut size | Count |
|---|---|---|
| Color A squares | 6 1/2 by 6 1/2 inches | 24 |
| Color B squares | 6 1/2 by 6 1/2 inches | 24 |
| Complete grid | Six squares across, eight rows down | 48 squares |
Scroll for more →
The finished grid is 6 × 6 = 36 inches wide and 8 × 6 = 48 inches long. Before its outer edges are bound, the sewn top should measure about 36 1/2 by 48 1/2 inches, including the outside seam allowances. Measure again after quilting and washing to find the final size.
For a fabric estimate, assume you have measured 40 inches of usable width after removing selvages. A 6 1/2-inch strip yields six squares because 6 × 6 1/2 = 39 inches. Four strips yield 24 squares, so each color needs 4 × 6 1/2 = 26 inches of fabric length before preparation and cutting allowance.
Check the seam before sewing the whole grid
Cut three extra sample squares from scrap fabric at the same 6 1/2-inch size. Join them in a row with the planned seam allowance. Their starting widths total 19 1/2 inches.
Two joins consume 1 inch in total across that row: each join uses 1/4 inch from each of its two pieces. The sample row should measure 18 1/2 inches long. Check the cut squares first if the row is not close to that figure.
Keep the machine setup that gives the correct sewn result. A foot edge can be a useful guide, but the measured seam matters more than its label. Make another sample after changing the foot or moving the needle position.
If you are choosing a machine, compare beginner quilting machines for control and fabric handling. Use the machine manual for threading, bobbins and the correct foot setup before trying to solve a seam problem with new equipment.
Lay out eight rows before joining them
Arrange all 48 squares on a clean surface. Check directional prints and the color sequence. Take a clear photo from above, then label each row at its left edge.
Pick up the first two squares of a row and place them right sides together. Sew the joining edge. Add the remaining squares in order until the row contains six squares.
Repeat for the other seven rows. Keep the labels attached away from the stitching area. Compare each completed row with the photo so a turned square does not travel unnoticed into the final top.
Press using the fabric's care guidance and a technique that keeps the row from stretching. Missouri Star's beginner video library includes a pressing-versus-ironing lesson if this step is new to you.
Join the rows and inspect the top
Place the first two rows right sides together. Match the ends and the seams between squares. Pin the intersections if that helps them stay aligned, then sew the long seam without pulling either row.
Open the pair and check it before adding another row. Small shifts can be fixed while the top is still easy to handle. Continue in the labeled order until all eight rows are joined.
A completed six-square row should measure about 36 1/2 inches across before joining to the next row. If one row is much shorter, inspect its seam widths and square count. Stretching it to meet a longer row can create ripples.
Lay the full top flat. Look for open seams, flipped squares and tucks. Remove stray threads that could show through a light fabric. Fix these now, before the backing hides the seam allowances.
Plan backing, batting and quilting
Measure the actual top. Choose backing and batting larger than that top by the amount your finishing method requires. If a longarm service will quilt it, ask for that service's preparation and margin requirements first.
For a home-machine practice plan, choose a backing and batting piece with room beyond every edge, then baste the layers according to the method you are using. Check the reverse for folds before quilting.
Simple straight quilting lines suit this grid. Their spacing must meet the batting maker's limit. The batting guide helps you read that requirement; do not assume that stitching only around large squares will suit every batting.
Test the complete sandwich on scraps before quilting the top. Rest its weight on the table. Work a manageable section, then rearrange the quilt before its weight starts steering the fabric.
Finish the edge and save the plan
After quilting, flatten and trim the quilt carefully. Measure the new perimeter for binding. Follow the hand-finished binding lesson or the machine method you tested on a sample.
Inspect the quilt front, back and edge before its first wash. Keep the final measurements and fabric care information with your records. The same grid can become a later project in new colors without adding a new construction skill.
Verdict on a beginner quilt
This beginner quilt gives you a clear count, one cut size and a useful seam check. Finish the 48-square grid before adding more difficult blocks. A complete small quilt teaches the whole process, including the layers and edge that turn a top into a quilt.
FAQ
Can I make this beginner quilt from two fabrics?
Yes. Cut 24 squares from each fabric at 6 1/2 inches square. Alternate them across each six-square row, then reverse the order in the next row. The eight rows use all 48 squares without a border.
Why does the top measure 36 1/2 inches before binding?
The finished grid is 36 inches across. The extra 1/2 inch allows for a 1/4-inch seam at each outer edge. Measure again after quilting, trimming and washing to find the finished quilt size.
Can I quilt only along the square seams?
Check your batting instructions first. The six-inch finished squares may leave areas too open for a particular filling. Add quilting lines as needed to meet the maker's spacing limit, and test the stitch through all the layers.