
Quilting
How to Make a Quilt: A 30-Rectangle Project
The short answer
Cut ten rectangles from each of three fabrics, check the seams and rows, then quilt and bind the layered top.
Last updated October 2026
What's covered9
Start your first quilt with 30 rectangles arranged in five columns and six rows. Each rectangle finishes at 7 by 8 inches, giving a 35-by-48-inch top before quilting and washing. The steps below show how to make a quilt from those pieces and how to quilt the layers before binding the edge.
Keep the cutting list and the steps together. The quilting guide helps you choose the materials, while this page carries one project from fabric to a finished edge. Use quilt making for beginners if you need a glossary before starting.
How to make a quilt: plan the 30 rectangles
Use 1/4-inch seams throughout the piecing. Add 1/2 inch to each finished dimension for the pair of opposite seam allowances. Each rectangle is therefore cut 7 1/2 by 8 1/2 inches.
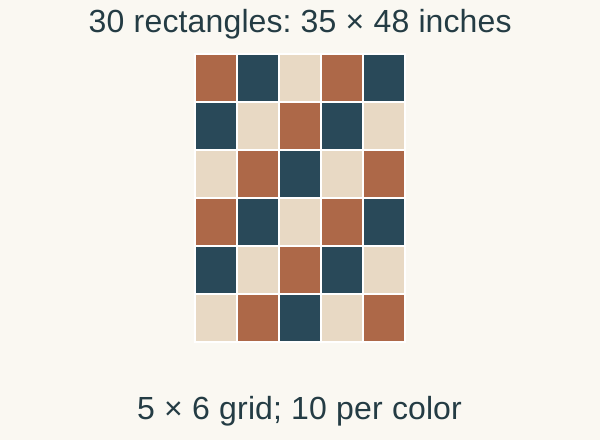
Choose three fabrics and cut 10 rectangles from each. The layout uses five pieces across and six rows down: 5 × 6 = 30. Keep the 7-inch finished side across the quilt and the 8-inch finished side running down it.
The planned finished top width is 5 × 7 = 35 inches. Its length is 6 × 8 = 48 inches. Before binding, the sewn top includes the outer seam allowances and should measure about 35 1/2 by 48 1/2 inches.
For this layout, move the colors to different positions in each row while keeping the rectangles upright. A rectangle turned a quarter turn would no longer fit the row height. A directional print can work if all its motifs face the same top edge.
Calculate fabric for the top
Assume each prepared fabric has 40 inches of usable width after selvages are removed. Cutting 8 1/2-inch-wide strips lets you cut five 7 1/2-inch rectangles across each strip: 5 × 7 1/2 = 37 1/2 inches.
Two strips produce the 10 rectangles needed from one color. Those strips use 2 × 8 1/2 = 17 inches of fabric length. A 3/4-yard piece is 27 inches long before preparation, giving more working room than a piece cut exactly to 17 inches.
Measure your fabric before using this estimate and allow for preparation, squaring and print placement. To center a motif in each rectangle, mark the cuts on paper first and check how many fit across the usable width.
Set aside fabric for binding separately. The binding is not included in the three top-fabric totals. The backing and batting will be sized from the actual sewn top after you choose how to quilt it.
Cut and test before batch sewing
Prepare the fabrics according to their care guidance, then square an edge for cutting. Use the cutting tool maker's handling directions and a suitable surface. Cut one rectangle first and check both dimensions before cutting the rest.
Sew a pair of scrap rectangles along their 8 1/2-inch sides with the planned 1/4-inch seam. Their starting width is 15 inches. The join consumes 1/2 inch in total, so the pair should measure 14 1/2 inches wide.
If that test is wrong, recheck the pieces and seam guide. A small seam error repeated four times across each row changes the top width. Solve it before you sew all the rectangles.
SINGER's quilting introduction provides a manufacturer overview. Follow your exact machine's manual for threading, the foot and the sewing setup used for the sample.
Arrange the colors and sew six rows
Lay out six rows with five rectangles in each. Distribute the three colors until the top feels balanced. Keep all rectangles in the same orientation and take a photo before moving them.
Label the rows at one side. Join the first two rectangles right sides together, then add the remaining three in order. Make all six rows the same way, checking the photo after each one.
The unjoined cut widths total 5 × 7 1/2 = 37 1/2 inches per row. Four seams consume 2 inches, leaving a 35 1/2-inch sewn row. Use that figure as a check before joining the rows together.
Press the seams without pulling the long row out of alignment. Missouri Star's tutorial library has a pressing-versus-ironing lesson. Keep the rows flat while they wait for the next step.
Join the rows into a top
Put the first two rows right sides together. Match their ends and the seams between rectangles. Pin where needed, then sew the long join with the same allowance used in the rows.
Open and inspect the pair before adding row three. Continue until all six rows are joined. Check that the top lies flat and that no rectangle has been turned or placed on the wrong row.
The six cut row heights total 51 inches. Five row joins consume 2 1/2 inches, giving the expected 48 1/2-inch unbound length. This second calculation checks the same top size from the cut pieces rather than the finished grid.
Repair open seams and remove loose threads now. Once the layers are together, the reverse of the top is harder to reach. A careful inspection at this stage can prevent a thread shadow under a light patch later.
Layer the top, batting and backing
Measure the sewn top. For a home-machine example, a 44-by-57-inch backing and batting piece gives 8 1/2 inches of total extra width and length around a 35 1/2-by-48 1/2-inch top. Centered, that is 4 1/4 inches beyond each edge.
Those margins are chosen for this example. If using a longarm quilting service, obtain its preparation and margin requirements before cutting the backing. Follow the service's method instead of assuming this home-machine allowance is sufficient.
Lay the backing wrong side up, add batting, then place the top right side up. Smooth each layer without stretching it. Baste with the method appropriate to your materials and check the back for folds.
How to quilt the layers with a simple plan
Test the machine on a sandwich made from the same materials. Choose straight quilting lines and confirm their spacing meets the batting maker's instructions. Work out the line placement on paper, then test your fabric marker on scraps before marking the top.
Rest the quilt on the table and sew a manageable section at a time. Check the backing after the first line and at regular pauses. Stop for a tuck or loose stitch while it still affects only a small area.
Use the beginner quilting machine guide if equipment choice is still open. A wide table supports the fabric, but you still need to arrange the quilt so it moves freely around the needle.
Trim, bind and inspect
After quilting, flatten the quilt and trim its perimeter carefully. Preserve the outer patchwork allowances. Measure the trimmed width and length, then calculate binding from that actual perimeter.
Use binding a quilt for the strip arithmetic and select a finishing method you have tested. Inspect the corners, both faces and the full edge before washing according to the materials' directions.
Verdict on how to make a quilt
Learning how to make a quilt is a series of measurable checks. Cut the 30 rectangles, verify a seam, join consistent rows and test the layered sandwich. Finish the edge and record the final size so the next quilt starts with experience you can use.
FAQ
How many pieces does this rectangle quilt need?
It needs 30 rectangles, arranged five across and six down. Cut each at 7 1/2 by 8 1/2 inches for the 1/4-inch seams used here. Ten rectangles from each of three fabrics give the full count.
Should I cut the backing before sewing the top?
Choose the backing early, but confirm its cutting size from the sewn top and the quilting method. A longarm service may require margins different from a home-machine project. Get those requirements before cutting away useful fabric.
What should I check before binding?
Finish the quilting and inspect both sides for tucks, loose stitches and open seams. Trim the perimeter carefully, then measure the actual width and length. Calculate binding from that trimmed size rather than the original pattern dimensions.