
Quilting
Quilts Using Scraps: Sort, Count and Sew Nine-Patches
The short answer
Measure the scraps before choosing a block. For this nine-patch quilt, test one block, then prepare 16 sets of five light and four dark squares.
Last updated October 2026
What's covered8
- Quilts using scraps: measure before choosing the block
- Cut squares for 16 nine-patch blocks
- Cut in small batches and keep a count
- Sew one nine-patch block accurately
- Keep prints balanced across the blocks
- Use awkward leftovers where they fit
- Finish the small top as a real quilt
- Verdict on quilts using scraps
To make quilts using scraps, measure the usable fabric first and choose blocks that fit it. Set long strips apart from pieces wide enough for squares. Count the patches you can cut before committing to a quilt size.
The nine-patch project below uses small squares from a mixed scrap box. For color and lightness choices, use scrap quilts. Before cutting, use the quilting guide to plan backing, batting and binding for the size you intend to make.
Quilts using scraps: measure before choosing the block
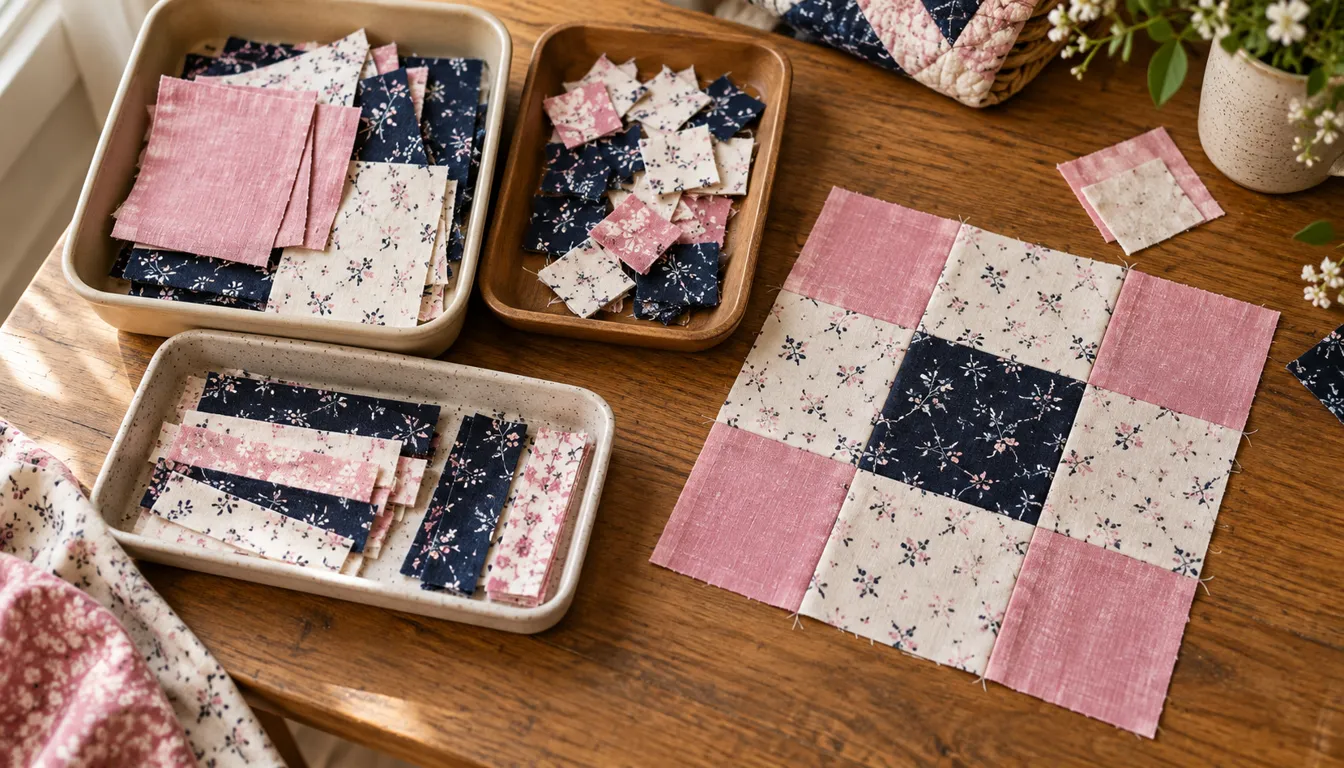
Spread the scraps on a clear surface. Separate large rectangles, square-like pieces, long strips and small odd shapes. Smooth folds before measuring so the usable area is clear.
Remove damaged sections and leave out fabrics that need a very different handling method. For this straight-grid project, choose similar cotton fabric weights. Stretchy jersey and heavy upholstery pieces belong in a plan built for their different behavior.
Measure inside the usable area, clear of selvages and frayed edges. A piece that looks like a 3-inch square may not contain a clean 2 1/2-inch square once its edge is straightened. Check before adding it to the count.
Avoid cutting the whole box into one small size immediately. Large scraps retain more options when kept large. Cut for the project you are making and save the remaining shapes for later work.
Cut squares for 16 nine-patch blocks
This project uses 16 nine-patch blocks arranged four across and four down. Each small square finishes at 2 inches. Cut the squares 2 1/2 inches to allow for 1/4-inch seams.
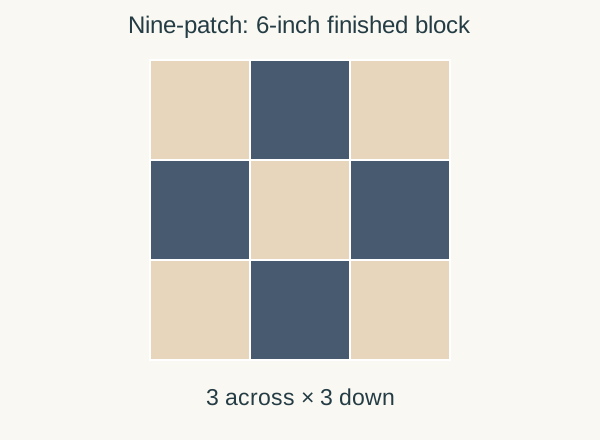
Each block contains nine squares in three rows of three. It finishes at 3 × 2 = 6 inches square and measures 6 1/2 inches before joining to the other blocks. Sixteen blocks produce a planned 24-inch-square top before quilting and washing.
The piece count is 16 × 9 = 144 squares. Choose 80 light squares and 64 dark squares for blocks with light corners and centers. Each block uses five lights and four darks, so the totals are 16 × 5 and 16 × 4.
This small top can become a wall piece or practice quilt. For a bigger project, increase the block count rather than changing the seam allowance. Six blocks across and seven down would need 42 blocks and 378 small squares, with a planned 36-by-42-inch finished top.
Cut in small batches and keep a count
Prepare a trial group of nine squares first. Check that they are all the same cut size, then sew the block before cutting 144 pieces. The sample confirms both the fabric choice and the seam setup.
Count cut squares in groups that match the block. A small tray holding five lights and four darks is one complete kit. Sixteen kits make the project count easy to inspect.
Keep narrow leftovers separate from the square count. A long strip is not a finished square until the required cut fits across its width. If it is too narrow, save it for a rail fence quilt or another strip-based plan with suitable dimensions.
Use the cutting tool maker's instructions and a compatible surface. Cut only the number of layers you can control. Speed gained by stacking more fabric is lost if the lower squares shift and need recutting.
Sew one nine-patch block accurately
Arrange the first row light-dark-light. Arrange the middle row dark-light-dark, then repeat the first row for the bottom. Keep the same lightness pattern while changing the individual prints.
Join the three squares in each row. Three cut widths total 7 1/2 inches; two joins consume 1 inch, leaving a 6 1/2-inch row. Check that measurement before joining the rows.
Join the three rows in order, matching the seams between squares. The same calculation applies to the block height, giving a 6 1/2-inch unfinished block. Press with the fabric's care needs in mind and check it flat.
If the block is too small, check the cut squares and measure the seam allowances. Correct the problem and sew another sample. Once it measures 6 1/2 inches square, use the same cuts and seam width for the remaining 15 blocks.
Keep prints balanced across the blocks
Lay out the completed blocks before joining them. The repeated light-dark pattern supplies structure, but a very bright print can still gather attention. Move blocks until those strong patches feel spread across the top.
Turn blocks only if directional prints allow it. A block that looks the same by lightness may contain a small animal or flower that now faces sideways. Check the actual fabric, not just the block outline.
Take a layout photo and label the rows. Join four blocks per row, then join four rows. The unbound top should measure about 24 1/2 inches square, including its outside allowances.
Four 6 1/2-inch blocks begin at 26 inches. Three joins consume 1 1/2 inches, giving 24 1/2 inches. This check can catch a missing block or a seam problem before the rows are assembled.
Use awkward leftovers where they fit
Not every scrap has to enter this top. Long strips can become binding if their grain, width and fabric weight suit the edge. Large pieces can help with backing. Tiny leftovers can supply future samples.
Browse the Robert Kaufman free-project library for patterns that use the pieces left in your scrap box. Check each pattern's fabric requirements and cutting list to see whether your scraps will fit.
Keep the project's leftovers until the quilt is finished. You may need a replacement patch, a binding repair or a small label backing. Sort the remainder after the final inspection rather than halfway through construction.
Label saved pieces by their useful dimensions if that helps you find them. A clear container marked with the size system you use is more practical than an expanding bag of unmeasured fabric.
Finish the small top as a real quilt
Choose batting and backing to suit the intended use and finishing method. Baste the layers and check the back for tucks. Quilt with a plan that meets the specific batting's stitch-spacing directions.
Test the stitch through light and dark scraps from this top. A thread that blends into one patch may stand out on the next. Decide whether that visible line supports the design before quilting the whole piece.
Use the binding guide to choose the edge finish. Compare beginner quilting machines if you need help with the equipment for piecing or handling the layers.
Inspect the quilt, then wash it according to the fabric and batting care directions. Write down how many scraps the project used and which sizes remain. That gives the next scrap project a real inventory to start from.
Verdict on quilts using scraps
Quilts using scraps are easier to finish when the count comes before the cutting. Build one accurate nine-patch, prepare 16 complete kits and keep the lightness order steady. Save pieces that do not fit for a project that can use their actual shapes.
FAQ
Should I cut every scrap into a small square?
Pick a project before cutting. Keep large scraps intact until you know the sizes you need; narrow strips may suit a different block. Measure inside frayed edges before counting a piece toward the cutting list.
How many squares does this scrap project need?
The 16 nine-patch blocks need 144 squares cut at 2 1/2 inches. Use 80 lights and 64 darks for the stated light-corner layout. Each block contains five lights and four darks, making the kit count easy to check.
What if a finished nine-patch is too small?
Check the cut squares, seam allowances and pressing before making more blocks. Before joining, each block should measure 6 1/2 inches square. Correct the trial unit rather than trimming every later block to match an unchecked error.