
Quilting
Quilt Patterns Using Fat Quarters: Cut Plans That Fit
The short answer
Check the largest cut before counting smaller patches. For the quilt below, each of ten fabrics must fit two 9 1/2-inch squares.
Last updated October 2026
What's covered8
- Plan quilt patterns using fat quarters you own
- Compare three square-cut yields
- Make a top from large squares: 36 by 45 inches
- Use the remaining area without double-counting it
- Decide when a smaller patch gives better use
- Lay out ten prints without grouping every pair
- Check quilt patterns using fat quarters against your cuts
- Verdict
Measure your fat quarters before choosing a quilt pattern, then check that each piece fits the required cuts. The quilt below uses two large squares from each of ten fabrics. Its twenty patches make a 36-by-45-inch top and leave plenty of each print visible.
Use the cloth's measured usable rectangle rather than the bundle name. For equal square cuts, divide each side by the cut size and keep only whole numbers. Multiply those two counts to get the yield. Then compare that yield with the pattern's patch count, leaving the backing and binding on a separate list.
Plan quilt patterns using fat quarters you own
Lay one piece flat and check its usable width and length. Exclude damaged or frayed edges. Follow the fabric's care directions and measure again after preparation. Check every piece: if one is too narrow for its cuts, the bundle may leave you short of patches.
Our quilting guide explains how fabric choices fit the rest of the quilt. If you are still shopping for a bundle, visit fat quarter quilt patterns. This page starts with cloth already on your table and asks what you can cut from it.
The calculations below show what fits in a usable 17-by-20-inch rectangle. Measure your own fabric and use its width and length in the same calculation. Even a small difference matters when the cuts fill a whole edge.
Compare three square-cut yields
Divide the usable side by the cut size and drop the fraction. You cannot cut a fraction of a full patch. A little spare area can still make a useful scrap, but it does not count toward the required whole-square total.
| Cut square | Across 17 inches | Down 20 inches | Whole squares |
|---|---|---|---|
| 3 1/2 inches | 4 | 5 | 20 |
| 5 inches | 3 | 4 | 12 |
| 6 1/2 inches | 2 | 3 | 6 |
Scroll for more →
For the 3 1/2-inch cut, four across use 14 inches and five down use 17 1/2 inches. For the 5-inch cut, three across use 15 inches and four down use 20 inches exactly. That last yield has no spare length, so a shorter usable piece changes it at once.
A rotated rectangle may give a different yield. Check both directions before cutting bars. For one-way prints, rotation can also turn the motif sideways, so the higher count may not create the look you want.
Make a top from large squares: 36 by 45 inches
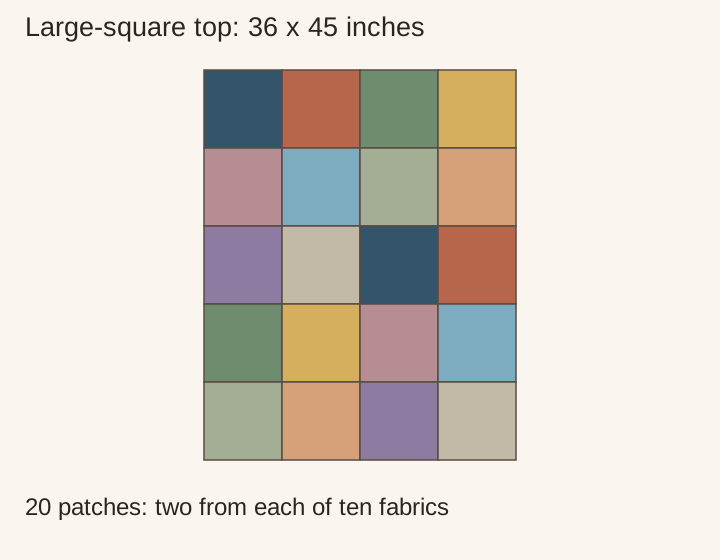
Choose ten fabric pieces that each contain a usable area at least 9 1/2 by 19 inches. Cut two 9 1/2-inch squares from each, side by side along the 19-inch edge. This cutting rectangle fits inside the measured 17-by-20-inch example piece. Do not rotate a one-way print unless that direction suits the layout.
Ten pieces yield 10 x 2 = 20 squares. All seams are 1/4 inch. Each cut square finishes at 9 inches, and the top uses four columns and five rows. The width is 4 x 9 = 36 inches; the height is 5 x 9 = 45 inches. Backing, batting and binding have their own requirements.
| Requirement | Calculation | Result |
|---|---|---|
| Squares per fabric | One row of two squares | 2 |
| Total square count | 10 fabrics x 2 | 20 |
| Grid count | 4 columns x 5 rows | 20 |
| Finished design | 4 x 9 by 5 x 9 | 36 by 45 inches |
Scroll for more →
Use the remaining area without double-counting it
The 17-by-20-inch example rectangle contains 17 x 20 = 340 square inches. Two 9 1/2-inch squares use 2 x 9.5 x 9.5 = 180.5 square inches, leaving 159.5 square inches. Measure the separate offcuts before planning another use for them; the total area alone does not tell you what will fit.
With the two squares placed along one side, a 7 1/2-by-20-inch strip can remain alongside them, plus a 9 1/2-by-1-inch strip at the end. Check the real cuts before planning either remnant. Save larger offcuts flat and label them with the measured size.
If you want a more detailed block, test its pieces on those remnants before buying more cloth. A few narrow leftovers may make small patches, but they cannot replace one large required square. Choose a new pattern from the shapes you have, rather than from the total leftover area alone.
Decide when a smaller patch gives better use
Compare the yield of two large squares with the yield of six smaller squares at 6 1/2 inches in the table. Ten pieces would then give 60 smaller squares. Each would finish at 6 inches with the same allowance. A six-column ten-row layout would finish at 36 by 60 inches, using all sixty.
That option has more patches and more joins. It also needs a larger back and more space during quilting. The large-square plan has twenty patches and shows more of each print. Pick the trade-off you want before cutting; the first cut commits the cloth to a size.
Lay out ten prints without grouping every pair
Use each fabric twice. Spread the matching squares apart so no pair shares an edge. Start with five lighter prints and five darker prints if you want a strong alternating layout. Each group then contributes ten squares, enough for a four-by-five checkerboard of light and dark.
Place the whole grid before sewing. Move any one-way motifs until they face the desired direction. A photograph preserves the arrangement when you stack the rows. Label the left end of each row so it does not reverse at the machine.
Sew a test row of four squares. Their combined cut width is 38 inches. Three joins use 1 1/2 inches, leaving a row that measures 36 1/2 by 9 1/2 inches. Make five rows, then join them for an unfinished top of 36 1/2 by 45 1/2 inches.
Check quilt patterns using fat quarters against your cuts
The Fat Quarter Shop fat-quarter library gives you publisher projects to compare. For each one, copy the largest required cut onto a size card. See whether that rectangle fits your actual cloth before counting smaller pieces.
Check the background fabric too. A fat-quarter-friendly label does not tell you whether the whole top comes from the bundle. Mark any additional yardage on your list. Our quilt patterns guide explains choosing a layout by method and print size.
If you enjoy small repeated units, compare free quilt block patterns. When shopping for a machine, use the beginner quilting machine guide to compare controls for slow, even piecing. Try sewing a few sample seams before starting a batch of blocks.
Verdict
For quilt patterns using fat quarters, measure the usable piece, test the largest cut and count whole patches. For the final 36-by-45-inch plan, use ten pieces with room for two 9 1/2-inch squares each. Keep the yield chart beside the fabric so a tempting layout does not outrun the cloth.
FAQ
Can every fat quarter make the same number of patches?
No. Usable dimensions, print direction and the cut size affect the yield. Measure every piece when the plan has little spare area.
How many pieces does the 36-by-45-inch plan use?
Ten measured fabric pieces, each yielding two 9 1/2-inch squares. That supplies twenty patches for four columns and five rows.
Can I use the leftover fabric for backing?
You can plan a pieced back, but count its cuts and joins separately. Leftover area alone does not prove that you have the required backing dimensions.